Level up your VS Code productivity: mastering AI workflows
Level up your VS Code productivity: mastering AI workflows
Session Date: 2026-02-14
Summary Date: 2026-02-14
Summarized By: Dario Airoldi
Recording Link: Watch on YouTube
Duration: ~21 minutes
Speakers: Burke Holland (Senior Cloud Advocate, Microsoft)
Executive summary
Burke Holland deconstructs the VS Code agent system prompt to reveal exactly where custom instructions, prompt files, and custom agents are inserted—and why that matters. He then demonstrates a practical three-phase workflow (Plan → Generate → Implement) that maximizes premium model usage by pairing expensive planning/coding with cheap implementation, saving tokens and improving accuracy.
Table of contents
- 🏗️ The VS Code agent system prompt architecture
- 📋 Custom instructions
- 📝 Prompt files
- 🧠 Context rot and context window management
- 🤖 Custom agents
- ⚡ Composing agentic workflows: plan, generate, implement
Session content
🏗️ The VS Code agent system prompt architecture
Discussed by: Burke Holland
Timestamps: 0:00 – 3:55
Burke walks through the complete anatomy of what happens when you send a message in VS Code Copilot Chat. The prompt sent to the model is built up in layers:
Key points:
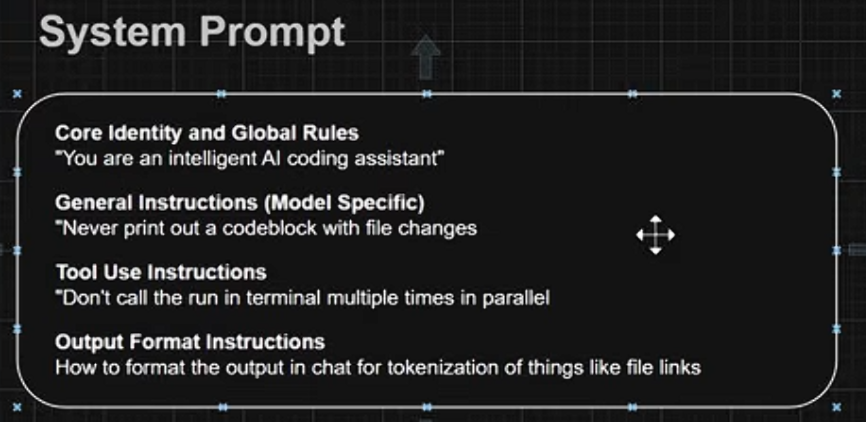
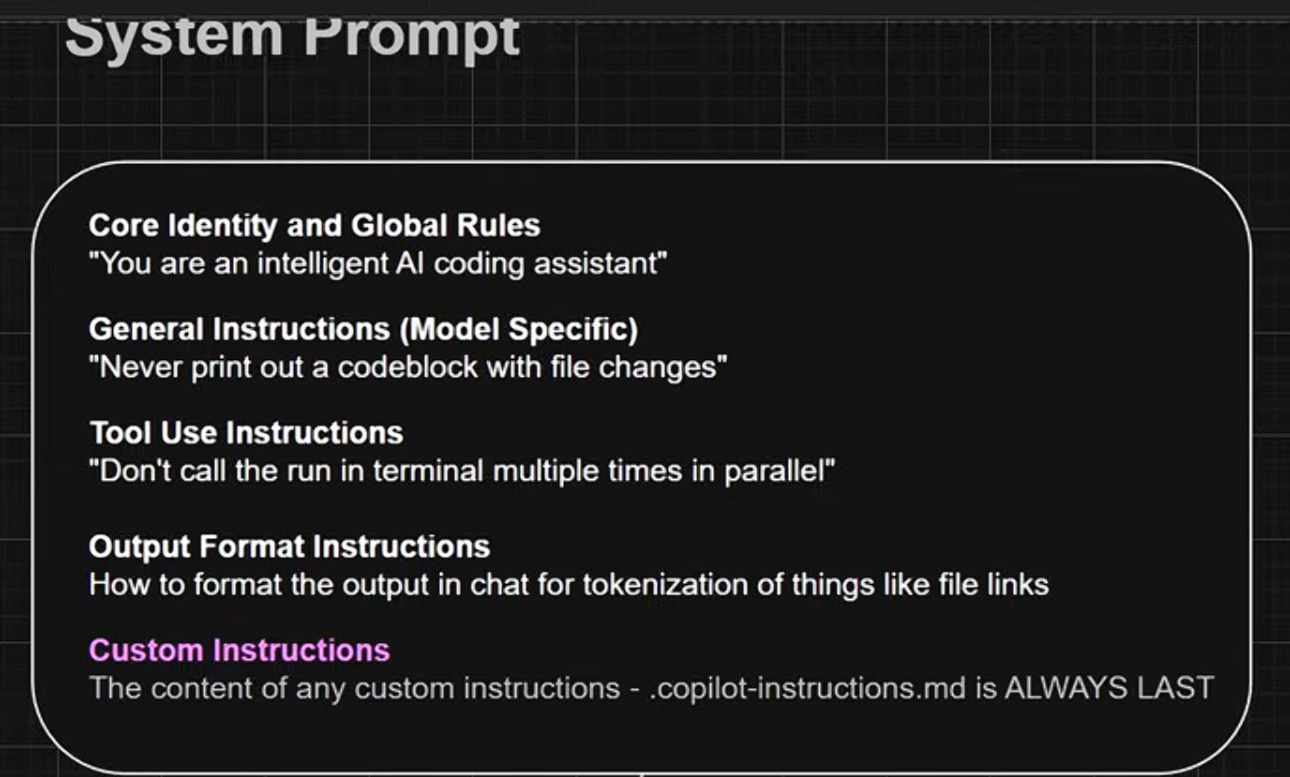
- The system prompt contains four layers: core identity and global rules, general instructions (model-specific quirks), tool use instructions, and output format instructions
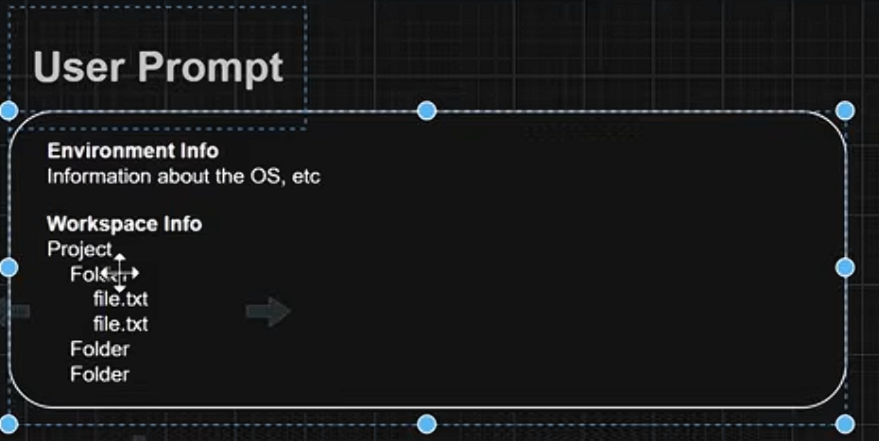
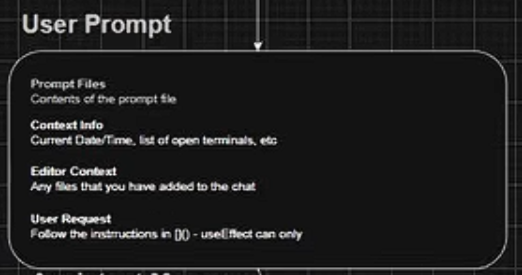
- A user prompt is appended with environment info (OS, etc.) and workspace info (project structure in text format)
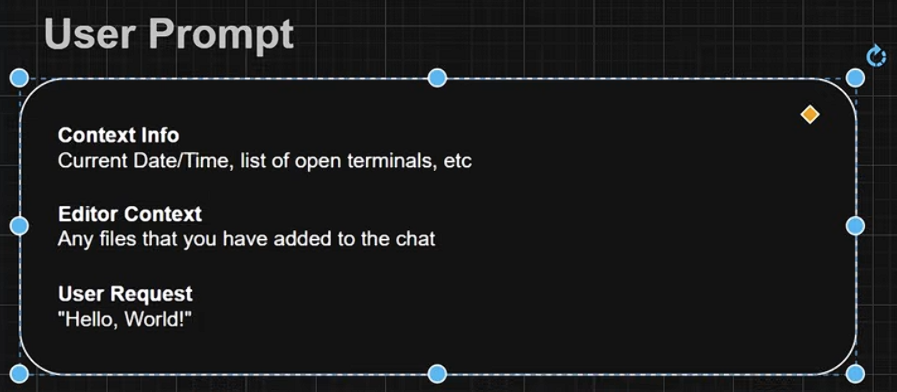
- A second user prompt adds context info—current date/time, open terminals, and any files explicitly attached to the chat
- Finally, the actual user message is appended, and the entire assembled prompt is sent to the model
- The model’s response becomes part of the context window, which grows with each exchange
“Behind the scenes, Copilot composes a prompt and it starts with a system prompt. The system prompt starts off with some core identity and global rules—this is just very generic stuff. It’s like ‘you are an intelligent AI coding assistant.’” — Burke Holland

📋 Custom instructions
Discussed by: Burke Holland
Timestamps: 3:56 – 6:56
Custom instructions provide high-level project information that helps the model give better answers. They’re the most common customization layer.
Key points:
- The most canonical use is to contain high-level information about your project architecture, patterns, and conventions
- VS Code can auto-generate chat instructions via the gear menu → “Generate chat instructions”—recommended for every project
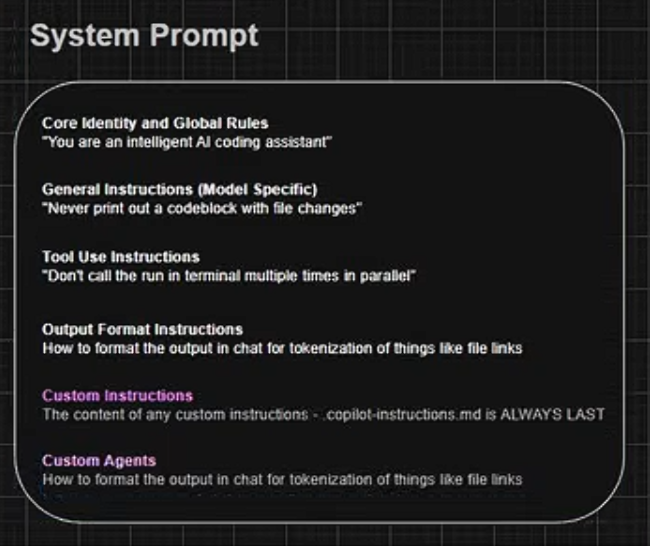
- Custom instructions are injected at the end of the system prompt, making them part of the system-level context
- You can create multiple instruction files; the
copilot-instructions.mdfile always comes last in the system prompt - Additional instruction files (e.g., framework-specific best practices) are inserted before
copilot-instructions.md
Demo summary: Burke installs a Next.js best practices instruction file from the Awesome Copilot repository. After installation, both the Next.js instructions and the project’s copilot instructions are automatically passed with every request.
Resources mentioned:
- Awesome Copilot — community-contributed prompt files, custom instructions, and custom agents
📝 Prompt files
Discussed by: Burke Holland
Timestamps: 6:57 – 12:07
Prompt files are reusable prompts you define and invoke from the chat with a / command. They offer powerful workflow composition capabilities.
Key points:
- Prompt files support front matter properties:
agent,description, andmodel
- The
modelproperty lets you override the active model—useful for routing cheap tasks to smaller models and saving premium requests - Prompt files are inserted into the user prompt (NOT the system prompt)—their contents appear before context info
- The user message references the prompt file by name using an internal syntax
- Prompt files can generate instruction files, creating a feedback loop between the two customization layers
Demo summary: Burke demonstrates a “remember” prompt file that uses GPT-4.1 (a cheaper model) to build up a memory/instruction file. Even though the active model is Claude Opus 4.5 (3x premium), the prompt file automatically switches to GPT-4.1 for the task, saving premium requests while building persistent project knowledge.
“You can see here how I’m kind of starting to build up workflows using actually both prompt files and custom instructions.” — Burke Holland
🧠 Context rot and context window management
Discussed by: Burke Holland
Timestamps: 10:24 – 12:07
Context rot is the degradation of model accuracy as the context window grows longer.
This phenomenon directly impacts how you should think about custom instructions and prompt files.
Key points:
- As the context window grows, model performance degrades—this is a documented phenomenon
- At 32,000 tokens, accuracy drops dramatically; even Claude 3.5 Sonnet goes from 88% to 30% accuracy
- VS Code limits context windows at certain thresholds specifically to maintain performance
- The practical advice: don’t worry about whether instructions perform better in the system prompt vs. user prompt—use each mechanism as designed for workflow composition
- Start new chat sessions frequently to reset the context window
🤖 Custom agents
Discussed by: Burke Holland
Timestamps: 12:08 – 15:07
Custom agents (formerly called custom modes) give the model a completely new identity and behavior, unlike custom instructions that only provide information.
Key points:
- Custom agents override or augment default agent behavior with a full agent-style prompt (identity, workflow, tools)
- They support
tools(what capabilities the agent has) andhandoffs(delegation to other agents) - Custom agents are injected after custom instructions in the system prompt—they’re the very last thing in the agent system prompt
- The key distinction: custom instructions give the model information; custom agents give the model an identity
Demo summary: Burke examines the built-in Plan mode agent, which follows a three-step workflow: gather context and research, present a concise plan for iteration, and handle user feedback. The Plan agent uses handoffs to delegate implementation to other agents.
“If we look at custom instructions, it’s just giving it information. This [custom agent] is giving it an identity. So, it’s very much like an agent system prompt.” — Burke Holland
⚡ Composing agentic workflows: plan, generate, implement
Discussed by: Burke Holland
Timestamps: 15:08 – 20:00
Burke demonstrates his personal three-phase workflow that maximizes premium model value while minimizing cost. This is the session’s key practical takeaway.
Key points:
- Phase 1 — Plan (prompt file, premium model): A custom planning prompt file uses Claude Opus 4.5 to research the codebase and produce a branch-oriented plan where each step is a testable commit
- Phase 2 — Generate (prompt file, premium model): A “generate” prompt takes the plan file and writes all implementation code into a markdown document—step by step, with checkboxes—without modifying the project
- Phase 3 — Implement (custom agent, free model): An “implement” custom agent uses a small, free model (VS Code Raptor Prime / GPT-4.1 mini variant) to implement code verbatim from the generated document
- Clear the context window between each phase to avoid context rot
- The implementation agent stops after each step, returning control so you can test, stage, and commit before proceeding
- Commits build up into a single pull request
Demo summary: Burke runs the full workflow: he plans a UI refactor with Opus 4.5, generates a ~2,000-line implementation document with all required code, then clears context and uses a free model to implement step by step. The result is a clean PR built iteratively with maximum use of the premium model’s reasoning and minimal cost during implementation.
“This strategy lets you sort of one-shot with a huge model and then implement and iterate with a small free model.” — Burke Holland
Main takeaways
- The prompt hierarchy is layered and predictable
- System prompt: core identity → general instructions → tool use → output format → custom instructions → custom agents
- User prompt: prompt file contents → environment info → workspace info → context info → user message
- Each customization mechanism has a distinct purpose
- Custom instructions = project information (system prompt)
- Prompt files = reusable workflows with model routing (user prompt)
- Custom agents = full identity override with tools and handoffs (system prompt, after instructions)
- Context rot is real—design your workflow around it
- Clear context between workflow phases
- Use the right-sized model for each task
- Don’t chase the “perfect” prompt position; use mechanisms as designed
- Premium model savings through workflow composition
- Use expensive models for planning and code generation (high reasoning)
- Use free/cheap models for implementation (low reasoning, high execution)
- A plan → generate → implement pattern can cut premium usage significantly
Questions raised
- Q: Does the placement of instructions (system prompt vs. user prompt) actually affect accuracy?
- A: Burke says “I don’t know”—but advises not to worry about it and instead use each mechanism as designed
- Status: Open — no definitive answer
- Q: How much premium request savings does the three-phase workflow achieve?
- A: Burke uses Opus 4.5 (3x multiplier) only twice (plan + generate), then a free model for all implementation
- Status: Answered — roughly 2 premium uses per feature vs. unlimited free implementation
Action items
📚 Resources and references
Official documentation
Visual Studio Code — Custom instructions [📘 Official]
Official VS Code documentation on customizing GitHub Copilot with instructions files, prompt files, and custom agents. Covers the .github/copilot-instructions.md file, instruction file front matter, and the full customization hierarchy.
Visual Studio Code — Prompt files [📘 Official]
Documentation on reusable prompt files (.prompt.md) including front matter properties like model, agent, and description. Explains how to define and invoke prompt files in chat.
Visual Studio Code — Custom agents (modes) [📘 Official]
Guide to creating custom chat agents with tools, handoffs, and full identity overrides. Includes the built-in Plan mode as an example.
Session materials
Level Up Your VS Code Productivity (YouTube) [📗 Verified Community]
Full recording of Burke Holland’s session including live demos of the system prompt architecture, Awesome Copilot integration, and the three-phase plan → generate → implement workflow.
Community resources
Awesome Copilot [📗 Verified Community]
Community-curated collection of prompt files, custom instructions, and custom agents for GitHub Copilot. Includes Burke Holland’s personal workflow files and contributions from the broader community. A great starting point for building your own AI workflows.
Context Rot — Understanding AI [📒 Community]
Article exploring how model performance degrades as context windows grow longer. Referenced by Burke Holland to explain why clearing context between workflow phases is important and why VS Code limits context window sizes.
Follow-up topics
- Handoffs between custom agents — Burke mentions handoffs briefly but doesn’t deep-dive into the mechanism. Worth exploring how to chain multiple custom agents together.
- Optimal model routing strategies — Which models are best for planning vs. code generation vs. implementation? How do you benchmark this?
- Context window size limits in VS Code — What are the actual limits, and how do they vary by model?
Next steps
- Review Burke Holland’s workflow files on Awesome Copilot
- Experiment with model overrides in prompt files to optimize premium request usage
- Build a custom implement agent tailored to your project’s tech stack